
-
Gutters and downpipes
Gutters and downpipes are essential components of a roof drainage system, specifically designed to collect rainwater and channel it safely away from the building’s structure. When correctly specified and installed, they protect the roof, external walls and foundation from water damage, lower the risk of leaks and damp, and help prevent soil erosion and surface pooling around pathways, planting beds and other hard surfaces.
Available in a wide range of materials, sizes and profiles to suit different architectural styles and climatic conditions, gutters and downpipes perform best when made from quality materials and fitted with care. Thoughtful design, correct sizing and professional installation reduce maintenance and repair costs, improve drainage reliability and resilience, and extend the service life of both the roofing system and the wider building. Regular inspection and timely cleaning further ensure optimal performance and long-term protection.
-
Fascia and soffit: functions, importance and best-practice installation
Fascia
Definition and role: The fascia is the horizontal board or panel fixed to the roof trusses or rafters at the roof edge. It provides the mounting surface for gutters and closes off the ends of the roof timbers, creating a clean, finished edge.
Structural importance: Beyond aesthetics, the fascia carries the load of the gutter system and transmits wind and water loads from the gutter to the roof structure. During heavy rainfall a saturated or blocked gutter can impose significant, concentrated weight on the fascia; if the fascia is weakened by rot, corrosion or poor fastening, this load can lead to gutter failure, fascia detachment and damage to the roof edge.
Common materials and selection criteria: Fascias are manufactured in timber (treated softwood, hardwood), uPVC, aluminium and composite materials. Material choice should be guided by durability, maintenance requirements, local climate, compatibility with gutter fixings and fire performance. For coastal or high-humidity locations, non-corrosive materials (aluminium or uPVC with appropriate support) are often preferable.
Inspection and maintenance: Regular inspection should check for rot, insect damage, cracked or split boards, loose fasteners and corrosion where metal fixings contact dissimilar materials. Timely painting, treatment of timber and replacement of damaged sections prevents progressive failure of the gutter-fascia assembly.
Soffit
Definition and role: The soffit is the finished underside of the eaves — the surface between the exterior wall and the roof overhang. Soffits close the gap under the eaves, protect the rafter tails and contribute to the thermal and moisture performance of the roof/wall junction.
Thermal, moisture and fire protection: Properly installed soffits reduce heat loss from the roof space, limit external moisture entry and can provide an additional barrier against fire spread into the roof void when constructed with suitable materials. Where soffits are compromised (holes, rot, detached panels), they allow moisture, pests and heat loss, which in turn increase the risk of mould, timber decay and higher energy use.
Ventilation function: One of the primary functional roles of many soffit systems is to provide controlled ventilation into the roof/attic space. Continuous or distributed soffit vents allow cool, dry air to enter at the eaves, supporting a balanced airflow path from soffit inlet to ridge or tile vents, removing moisture and reducing condensation risk. Modern practice commonly incorporates a vent beneath roof tiles or integrated tile vents combined with ventilated soffits to ensure adequate airflow and prevent dead-air pockets.
Materials and maintenance: Soffits are available in timber, uPVC, aluminium and fibre-cement. Choose materials resistant to the local environment and compatible with eaves detailing. Maintenance includes clearing insect or bird nests, checking ventilation openings are unobstructed, and repairing or replacing damaged panels.
Distinguishing fascia, soffit, barge boards and cladding
Fascia vs soffit: Fascia is a vertical or near-vertical finishing element at the roof edge that supports gutters; soffit is the underside of the overhang. They are separate components with different structural and performance responsibilities.
Barge board: Barge boards run along the gable ends of the roof and protect and finish the exposed rafter ends at the gable. They are distinct from fascia/soffit which relate to the eaves.
Cladding: Cladding is the external wall finish and may overlap or interface with eaves details, but it is not a roof-edge component.
Best-practice installation guidance
Design ventilation as a system: Provide continuous soffit ventilation or well-distributed vents rated to achieve the required free area, paired with appropriate ridge or tile vents to establish a clear airflow path from eaves to ridge.
Specify materials for environment and fire performance: Use non-combustible or fire-retardant soffit materials where required by local codes and select corrosion-resistant fascia fixings in corrosive atmospheres.
Ensure secure fixing for gutters: Fascias must be sufficiently robust and securely fixed to support gutter loads and live loading during maintenance. When retrofitting uPVC or aluminium facias over timber, ensure backing support and fixings are adequate.
Access and maintenance planning: Design for access to gutters and eaves for debris clearance, inspection and repair. Incorporate removable inspection panels where appropriate.
When to repair or replace
Replace or substantially repair fascia when there is visible rot, separation from rafter ends, repeated gutter failures or compromised fixings.
Replace soffits when ventilation paths are blocked, panels are damaged or there is mould/decay indicating moisture ingress.
Consider full eaves renewal where multiple components (fascia, soffit, gutters, rafter ends) are deteriorated — partial repairs
-
Leadwork, flashings and decorative lead elements provide a durable, weatherproof and aesthetically refined finish for roofs and architectural features. Lead is a proven material in roofing and building work: it is highly durable, naturally corrosion-resistant and exceptionally malleable, allowing it to be formed to tight junctions and complex profiles without cracking. Because of these properties, lead is ideally suited for flashings around chimneys, dormers and skylights, for valley and parapet details, and for bespoke cladding or rainwater goods.
Key benefits
Long service life: correctly installed leadwork can last many decades with minimal maintenance.
Weatherproof performance: lead creates watertight seals at vulnerable junctions and provides reliable protection against penetrating moisture.
Formability: lead’s malleability enables precise detailing, seamless wraps and complex contours that are difficult to achieve with other metals.
Aesthetic versatility: decorative lead can be crafted into cresting, finials, sculptural panels and ornamental features that complement both traditional and contemporary architecture.
Added property value: high-quality leadwork enhances appearance and can increase the perceived and real value of a building.
Installation and craftsmanship Leadwork demands specialist skills, precise patterning and careful workmanship. Proper installation involves:
Accurate templates and measurement to ensure tight-fitting seams and correct falls for drainage.
Welding, soldering or historically appropriate leadwork joints executed by trained operatives.
Integration with adjacent materials (tiles, slates, brickwork, flashing membranes) to maintain continuous weatherproofing.
Consideration of expansion, contraction and movement to avoid stress on joints and fixings.
Appropriate fixing methods and substrate preparation to ensure long-term stability
Leadwork, flashings and decorative lead elements provide a durable, weatherproof and aesthetically refined finish for roofs and architectural features. Lead is a proven material in roofing and building work: it is highly durable, naturally corrosion-resistant and exceptionally malleable, allowing it to be formed to tight junctions and complex profiles without cracking. Because of these properties, lead is ideally suited for flashings around chimneys, dormers and skylights, for valley and parapet details, and for bespoke cladding or rainwater goods.
Key benefits
Long service life: correctly installed leadwork can last many decades with minimal maintenance.
Weatherproof performance: lead creates watertight seals at vulnerable junctions and provides reliable protection against penetrating moisture.
Formability: lead’s malleability enables precise detailing, seamless wraps and complex contours that are difficult to achieve with other metals.
Aesthetic versatility: decorative lead can be crafted into cresting, finials, sculptural panels and ornamental features that complement both traditional and contemporary architecture.
Added property value: high-quality leadwork enhances appearance and can increase the perceived and real value of a building.
Installation and craftsmanship Leadwork demands specialist skills, precise patterning and careful workmanship. Proper installation involves:
Accurate templates and measurement to ensure tight-fitting seams and correct falls for drainage.
Welding, soldering or historically appropriate leadwork joints executed by trained operatives.
Integration with adjacent materials (tiles, slates, brickwork, flashing membranes) to maintain continuous weatherproofing.
Consideration of expansion, contraction and movement to avoid stress on joints and fixings.
Appropriate fixing methods and substrate preparation to ensure long-term stability.
Maintenance and regulation Although low-maintenance, leadwork benefits from periodic inspection to identify displaced seams, damage from foot traffic or incompatible repairs. Work should comply with current building regulations, codes of practice and, where applicable, conservation guidelines for historic buildings.
When to choose lead Lead is the preferred choice where longevity, fine detail and a sympathetic appearance are priorities—particularly on period properties, high-end new builds and bespoke architectural projects. For reliable, long-lasting and attractive roof and decorative metalwork, professionally installed lead remains a first-rate solution.
-
Velux window installation enhances natural light, ventilation, and usable space in pitched-roof homes. The process is a specialised roof alteration that requires precise measurement, weatherproofing and structural care to maintain roof integrity and long-term performance.
Typical installation stages
Site assessment and planning: Inspect the roof structure, rafters and attic space to confirm suitability and determine the optimal window location for light, view and ventilation. Check for obstructions (pipes, wiring, insulation) and verify roof pitch and covering material to select the correct Velux model and flashing kit.
Structural preparation: Mark and cut a roof opening sized to the manufacturer’s specifications. Where necessary, install header and sill framing to transfer loads around the new opening and maintain rafter spacing and roof strength. Protect internal finishes and insulation during the work.
Underlayment and weatherproofing: Integrate the window into the roof’s waterproofing plane. This includes trimming or replacing underlayment and applying appropriate membranes to prevent water ingress at the roof penetration.
Flashing kit installation: Fit the manufacturer's flashing kit matched to the roof covering (tiles, slates, metal or shingles). The flashing creates a watertight transition between the window frame and roofing material; proper overlap, sealing and fixing are critical for long-term performance and to avoid leaks.
Window placement and fixing: Set the Velux unit into the prepared opening, ensuring it is square and plumb. Secure the frame to the rafters or framing members according to manufacturer torque and fixings. Check alignment and operation of opening mechanisms.
Insulation and internal finishing: Install insulation and vapour control layers around the frame to maintain thermal performance and prevent condensation. Fit internal trims, reveals and finishes to match the room decor and provide a neat, airtight finish.
External finishing and roof reinstatement: Replace or reposition roof coverings around the flashing, dress adjacent tiles or slates and ensure all fixings are sealed. Clean the work area and check roof drainage to prevent ponding.
Quality checks and commissioning: Perform a water-tightness inspection and operational check of the window (opening, closing, locks). Confirm that flashing is correctly seated and that internal seals and insulation meet current building regulations and performance expectations.
Compliance and warranties
Installations must follow the Velux manufacturer’s instructions and relevant building regulations. Using manufacturer-approved flashing kits, recommended fixings and certified installers preserves product warranties and ensures compliance with local building codes.
Benefits and considerations
Benefits: Increased daylight, passive ventilation, potential reduction in artificial lighting and improved occupant comfort. Can also add perceived space in loft conversions.
Considerations: Requires structural assessment, temporary disruption during installation and careful waterproofing. Roof type and pitch influence product selection and complexity.
For reliable results, use experienced roofing professionals familiar with Velux systems to ensure correct structural modifications, watertight flashing and proper insulation for long-term performance.
Velux window installation enhances natural light, ventilation, and usable space in pitched-roof homes. The process is a specialised roof alteration that requires precise measurement, weatherproofing and structural care to maintain roof integrity and long-term performance.
Typical installation stages
Site assessment and planning: Inspect the roof structure, rafters and attic space to confirm suitability and determine the optimal window location for light, view and ventilation. Check for obstructions (pipes, wiring, insulation) and verify roof pitch and covering material to select the correct Velux model and flashing kit.
Structural preparation: Mark and cut a roof opening sized to the manufacturer’s specifications. Where necessary, install header and sill framing to transfer loads around the new opening and maintain rafter spacing and roof strength. Protect internal finishes and insulation during the work.
Underlayment and weatherproofing: Integrate the window into the roof’s waterproofing plane. This includes trimming or replacing underlayment and applying appropriate membranes to prevent water ingress at the roof penetration.
Flashing kit installation: Fit the manufacturer's flashing kit matched to the roof covering (tiles, slates, metal or shingles). The flashing creates a watertight transition between the window frame and roofing material; proper overlap, sealing and fixing are critical for long-term performance and to avoid leaks.
Window placement and fixing: Set the Velux unit into the prepared opening, ensuring it is square and plumb. Secure the frame to the rafters or framing members according to manufacturer torque and fixings. Check alignment and operation of opening mechanisms.
Insulation and internal finishing: Install insulation and vapour control layers around the frame to maintain thermal performance and prevent condensation. Fit internal trims, reveals and finishes to match the room decor and provide a neat, airtight finish.
External finishing and roof reinstatement: Replace or reposition roof coverings around the flashing, dress adjacent tiles or slates and ensure all fixings are sealed. Clean the work area and check roof drainage to prevent ponding.
Quality checks and commissioning: Perform a water-tightness inspection and operational check of the window (opening, closing, locks). Confirm that flashing is correctly seated and that internal seals and insulation meet current building regulations and performance expectations.
Compliance and warranties
Installations must follow the Velux manufacturer’s instructions and relevant building regulations. Using manufacturer-approved flashing kits, recommended fixings and certified installers preserves product warranties and ensures compliance with local building codes.
Benefits and considerations
Benefits: Increased daylight, passive ventilation, potential reduction in artificial lighting and improved occupant comfort. Can also add perceived space in loft conversions.
Considerations: Requires structural assessment, temporary disruption during installation and careful waterproofing. Roof type and pitch influence product selection and complexity.
For reliable results, use experienced roofing professionals familiar with Vel
-
Moss removal for commercial and residential roofing is a specialized service that combines careful inspection, mechanical cleaning, and targeted treatment to protect roof integrity and extend service life.
Assessment
Conduct a thorough roof inspection to determine the extent of moss, lichen, and algae growth, identify moisture traps and shaded areas that encourage regrowth, and check for underlying damage such as lifted, cracked or missing shingles, compromised flashings, and clogged gutters.
Document roof material (asphalt shingles, slate, tile, metal, etc.), slope, access points and any manufacturer restrictions or warranties that could affect cleaning methods.
Preparation and safety
Implement fall protection and site safety measures: harnesses, guardrails, warning lines and controlled access zones as appropriate.
Protect landscaping, solar panels, skylights, and exterior finishes with drop cloths or temporary coverings. Mask or divert downspouts to prevent runoff staining near sensitive landscaping.
Use non-corrosive tools and equipment calibrated for the roof type to avoid surface damage.
Cleaning methods
Remove loose debris first using low-pressure air blowers or soft-bristle brooms to avoid abrading roofing material.
Perform manual, low-pressure washing and gentle brushing where necessary. High-pressure washing is generally avoided on asphalt shingles and softer materials because it can strip granules or dislodge tiles.
On hard surfaces (metal, concrete tile, slate) approved low-pressure rinsing may be used when compatible with the roofing system.
Chemical treatment and prevention
Apply a professional-grade, roof-safe biocide or algaecide formulated to kill moss, algae and lichen. Choose products that are compatible with the roof material and comply with local environmental regulations.
For long-term control, apply treatments containing zinc or copper compounds or enzyme-based formulations that inhibit regrowth while minimizing environmental impact.
When appropriate, install or recommend zinc or copper strips at ridge lines to provide ongoing protection by releasing trace metals during rainfall.
Repairs and maintenance recommendations
Replace or repair any damaged shingles, flashings, or underlayment found during the inspection to eliminate moisture entry points.
Clean and clear gutters and downspouts to restore proper drainage and reduce conditions that favor moss growth.
Provide a maintenance schedule and options for periodic inspections and re-treatments to prevent recurrence; frequency depends on local climate and site conditions (typically 1–3 years).
Environmental and warranty considerations
Use products and disposal methods that meet environmental best practices and local regulations to protect plants and stormwater.
Confirm that cleaning methods and chemicals are compatible with existing roof warranties; document procedures and materials used for client records and warranty compliance.
Benefits
Restores
Moss removal for commercial and residential roofing is a specialized service that combines careful inspection, mechanical cleaning, and targeted treatment to protect roof integrity and extend service life.
Assessment
Conduct a thorough roof inspection to determine the extent of moss, lichen, and algae growth, identify moisture traps and shaded areas that encourage regrowth, and check for underlying damage such as lifted, cracked or missing shingles, compromised flashings, and clogged gutters.
Document roof material (asphalt shingles, slate, tile, metal, etc.), slope, access points and any manufacturer restrictions or warranties that could affect cleaning methods.
Preparation and safety
Implement fall protection and site safety measures: harnesses, guardrails, warning lines and controlled access zones as appropriate.
Protect landscaping, solar panels, skylights, and exterior finishes with drop cloths or temporary coverings. Mask or divert downspouts to prevent runoff staining near sensitive landscaping.
Use non-corrosive tools and equipment calibrated for the roof type to avoid surface damage.
Cleaning methods
Remove loose debris first using low-pressure air blowers or soft-bristle brooms to avoid abrading roofing material.
Perform manual, low-pressure washing and gentle brushing where necessary. High-pressure washing is generally avoided on asphalt shingles and softer materials because it can strip granules or dislodge tiles.
On hard surfaces (metal, concrete tile, slate) approved low-pressure rinsing may be used when compatible with the roofing system.
Chemical treatment and prevention
Apply a professional-grade, roof-safe biocide or algaecide formulated to kill moss, algae and lichen. Choose products that are compatible with the roof material and comply with local environmental regulations.
For long-term control, apply treatments containing zinc or copper compounds or enzyme-based formulations that inhibit regrowth while minimizing environmental impact.
When appropriate, install or recommend zinc or copper strips at ridge lines to provide ongoing protection by releasing trace metals during rainfall.
Repairs and maintenance recommendations
Replace or repair any damaged shingles, flashings, or underlayment found during the inspection to eliminate moisture entry points.
Clean and clear gutters and downspouts to restore proper drainage and reduce conditions that favor moss growth.
Provide a maintenance schedule and options for periodic inspections and re-treatments to prevent recurrence; frequency depends on local climate and site conditions (typically 1–3 years).
Environmental and warranty considerations
Use products and disposal methods that meet environmental best practices and local regulations to protect plants and stormwater.
Confirm that cleaning methods and chemicals are compatible with existing roof warranties; document procedures and materials used for client records and warranty compliance.
-
Cladding is a layer of material applied to building walls for protection and insulation. Exterior cladding shields the structure from weather, while interior cladding focuses on safety and soundproofing. Materials range from wood to composite panels,
-
Chimney Removal
Chimney removal is the controlled dismantling and extraction of an existing chimney structure from a building. This process is undertaken for safety, structural, aesthetic, or renovation reasons and requires careful planning and skilled execution to protect the home and surrounding areas.
When and why removal is needed
Structural deterioration: Cracked flues, loose masonry, or compromised chimney stacks can create collapse hazards and allow water infiltration that damages the roof and interior.
Redundant chimneys: When fireplaces are decommissioned or heating systems are replaced, an unused chimney can be removed to reclaim roof space and simplify maintenance.
Roof and renovation work: Chimneys can obstruct roof replacement, dormer installation, or loft conversions. Removal may be the most practical option to achieve design objectives.
Aesthetic or energy-efficiency goals: Removing a bulky or unsightly chimney can improve curb appeal and reduce thermal bridging that causes heat loss.
Typical removal process (summary)
Site assessment and planning: Inspect chimney condition, roof structure, and interior finishes. Identify utilities, flues, and any hazardous materials (e.g., creosote, asbestos) that require special handling. Obtain necessary permits and agree on access, waste removal, and temporary protection measures.
Structural protection and temporary weatherproofing: Install scaffolding and roof protection to prevent damage. Provide temporary flashing or covers to keep the interior dry once the chimney is opened.
Careful dismantling: Remove chimney components from the top down using methods suited to the material—hand dismantling, mechanical chipping, or selective cutting—minimizing vibration and impact to surrounding masonry and roof timbers. -Flue and liner removal: Extract flue liners and clean or cap remaining vents. If a liner continues to service other appliances, it may be retained and sealed appropriately.
Roof and roofline restoration: Rebuild roof decking, rafters, or collar ties if necessary. Install new roofing substrate, underlayment, and flashing to ensure watertight integration with the existing roof.
Interior repairs and finishes: Repair ceilings, chimney breasts, or fireplaces affected by removal. Replaster, skim, or remove chimney breasts to suit the renovation plan.
Waste removal and site cleanup: Dispose of masonry and construction debris in accordance with local regulations and leave the site safe and tidy.
Safety and regulatory considerations
Structural engineers: Complex or load-bearing chimneys may require structural engineer input to assess the impact of removal on roof and wall stability.
Permits and building codes: Local building regulations often require permits for full chimney removal and for the repair of roof openings. Inspections may be required at key stages.
Hazardous materials: Older chimneys can contain asbestos in mortar, liners, or seals; qualified abatement may be required.
Fire and ventilation: Removing a chimney serving active appliances requires rerouting ventilation or decommissioning appliances safely to meet building and fire safety codes.
Alternatives and partial options
Chimney Removal
Chimney removal is the controlled dismantling and extraction of an existing chimney structure from a building. This process is undertaken for safety, structural, aesthetic, or renovation reasons and requires careful planning and skilled execution to protect the home and surrounding areas.
When and why removal is needed
Structural deterioration: Cracked flues, loose masonry, or compromised chimney stacks can create collapse hazards and allow water infiltration that damages the roof and interior.
Redundant chimneys: When fireplaces are decommissioned or heating systems are replaced, an unused chimney can be removed to reclaim roof space and simplify maintenance.
Roof and renovation work: Chimneys can obstruct roof replacement, dormer installation, or loft conversions. Removal may be the most practical option to achieve design objectives.
Aesthetic or energy-efficiency goals: Removing a bulky or unsightly chimney can improve curb appeal and reduce thermal bridging that causes heat loss.
Typical removal process (summary)
Site assessment and planning: Inspect chimney condition, roof structure, and interior finishes. Identify utilities, flues, and any hazardous materials (e.g., creosote, asbestos) that require special handling. Obtain necessary permits and agree on access, waste removal, and temporary protection measures.
Structural protection and temporary weatherproofing: Install scaffolding and roof protection to prevent damage. Provide temporary flashing or covers to keep the interior dry once the chimney is opened.
Careful dismantling: Remove chimney components from the top down using methods suited to the material—hand dismantling, mechanical chipping, or selective cutting—minimizing vibration and impact to surrounding masonry and roof timbers. -Flue and liner removal: Extract flue liners and clean or cap remaining vents. If a liner continues to service other appliances, it may be retained and sealed appropriately.
Roof and roofline restoration: Rebuild roof decking, rafters, or collar ties if necessary. Install new roofing substrate, underlayment, and flashing to ensure watertight integration with the existing roof.
Interior repairs and finishes: Repair ceilings, chimney breasts, or fireplaces affected by removal. Replaster, skim, or remove chimney breasts to suit the renovation plan.
Waste removal and site cleanup: Dispose of masonry and construction debris in accordance with local regulations and leave the site safe and tidy.
Safety and regulatory considerations
Structural engineers: Complex or load-bearing chimneys may require structural engineer input to assess the impact of removal on roof and wall stability.
Permits and building codes: Local building regulations often require permits for full chimney removal and for the repair of roof openings. Inspections may be required at key stages.
Hazardous materials: Older chimneys can contain asbestos in mortar, liners, or seals; qualified abatement may be required.
Fire and ventilation: Removing a chimney serving active appliances requires rerouting ventilation or decommissioning appliances safely to meet building and fire safety codes.
Alternatives and partial options
Chimney capping or decommissioning: If removal is undesirable, capping and insulating the flue or making the chimney non-functional can address heat loss and water ingress.
Partial removal: Removing the above-roof portion (parapet or stack) while retaining an internal flue can be a compromise in certain renovations.
Why hire professionals Chimney removal involves structural, weatherproofing, and safety challenges that require experienced tradespeople. Professionals provide accurate assessments, safe dismantling methods, proper integration with roofing systems, and compliance with codes and permits—reducing risk and ensuring durable results.
If you’d like, we can provide an on-site inspection and written proposal outlining costs, timeline, and the specific steps required for your property.
What We Offer
We offer a full range of roofing services to meet every client’s needs. If you have a specific project in mind that isn’t listed, we’ll work with you to develop a custom quote tailored to your requirements and budget. Contact us to discuss scope, materials, timelines, and any special considerations — we’ll provide a clear, detailed estimate and professional recommendations.
-
Torch-applied (torch-on) bitumen roofing system
Torch-on roofing consists of three layers of bitumen-infused felt that are heat-welded together and bonded to the roof deck using a propane blow torch. This multi-layer assembly creates a continuous, flexible, and fully waterproof membrane that is highly resistant to water penetration and wind uplift when properly installed.
Typical layer composition
Vapour control layer: A base sheet designed to limit moisture movement from the building into the roof build-up. This sheet helps prevent condensation within the roof structure and protects the insulation and deck from long-term moisture damage.
Reinforced underlay: A reinforced bituminous felt (often with a glass fibre or polyester scrim) that provides structural stability, tensile strength and dimensional control for the membrane. It helps distribute stresses and reduces the risk of tearing or deformation.
Cap (wear) sheet with mineral surface: The outermost layer is a bitumen cap sheet finished with mineral granules or slate chippings. This layer offers weather resistance, UV protection and abrasion resistance, extending the life of the roof and improving aesthetics.
Performance and benefits
Waterproof continuity: Heat-welding produces a seamless bond between sheets and at laps, eliminating most of the penetrations and weak points associated with mechanically fixed systems.
Durability: Properly installed torch-on systems deliver long service life, good resistance to ponding water and strong wind performance.
Flexibility: The torch-on membrane accommodates small movements in the roof structure without splitting.
Maintenance: Mineral-capped cap sheets protect the bitumen from UV degradation; periodic inspections and prompt attention to flashings and seams prolong membrane life.
Considerations and best practice
Skilled installation: Torch-on application requires trained operatives who follow safety procedures for working with open flame and heat. Correct flame control and joint detailing are essential to avoid cold laps, blistering or damage to underlying materials.
Substrate preparation: The roof deck must be clean, dry and suitably primed. A compatible vapour control layer, adequate insulation and proper falls for drainage are important for long-term performance.
Fire risk and regulations: On some sites or building types (for example near combustible
Torch-applied (torch-on) bitumen roofing system
Torch-on roofing consists of three layers of bitumen-infused felt that are heat-welded together and bonded to the roof deck using a propane blow torch. This multi-layer assembly creates a continuous, flexible, and fully waterproof membrane that is highly resistant to water penetration and wind uplift when properly installed.
Typical layer composition
Vapour control layer: A base sheet designed to limit moisture movement from the building into the roof build-up. This sheet helps prevent condensation within the roof structure and protects the insulation and deck from long-term moisture damage.
Reinforced underlay: A reinforced bituminous felt (often with a glass fibre or polyester scrim) that provides structural stability, tensile strength and dimensional control for the membrane. It helps distribute stresses and reduces the risk of tearing or deformation.
Cap (wear) sheet with mineral surface: The outermost layer is a bitumen cap sheet finished with mineral granules or slate chippings. This layer offers weather resistance, UV protection and abrasion resistance, extending the life of the roof and improving aesthetics.
Performance and benefits
Waterproof continuity: Heat-welding produces a seamless bond between sheets and at laps, eliminating most of the penetrations and weak points associated with mechanically fixed systems.
Durability: Properly installed torch-on systems deliver long service life, good resistance to ponding water and strong wind performance.
Flexibility: The torch-on membrane accommodates small movements in the roof structure without splitting.
Maintenance: Mineral-capped cap sheets protect the bitumen from UV degradation; periodic inspections and prompt attention to flashings and seams prolong membrane life.
Considerations and best practice
Skilled installation: Torch-on application requires trained operatives who follow safety procedures for working with open flame and heat. Correct flame control and joint detailing are essential to avoid cold laps, blistering or damage to underlying materials.
Substrate preparation: The roof deck must be clean, dry and suitably primed. A compatible vapour control layer, adequate insulation and proper falls for drainage are important for long-term performance.
Fire risk and regulations: On some sites or building types (for example near combustible materials or in high fire risk areas), local regulations or building insurance may restrict or prohibit hot-work application. Alternative self-adhesive or hot-melt systems can be specified where torch use is not permitted.
Detailing: Flashings, upstands, pipe penetrations and gutters require meticulous detailing to maintain integrity at junctions and transitions.
Shed felt (garden building felt)
Shed felt is a lighter-duty bituminous felt product intended for outbuildings, garden sheds and other small roofed structures. It is formulated to provide economical weatherproofing where heavy-duty roofing membranes are unnecessary.
Forms and application
Torch-on shed felt: Uses the same torch-welding technique as larger torch-on systems but in a thinner construction suitable for small roofs. It provides a longer-lasting, more robust finish than simple roll felt when permitted and
-
EPDM (ethylene propylene diene terpolymer) is a high-performance synthetic rubber roofing membrane engineered for durability and long-term weather resistance on low-slope and flat commercial buildings. Its polymer base is formed from ethylene and propylene—hydrocarbon feedstocks derived from oil and natural gas—combined with a diene component that enables effective vulcanization and cross-linking, producing a flexible, resilient membrane with excellent elasticity across a wide temperature range.
Key performance characteristics
Weather and UV resistance: EPDM provides outstanding resistance to ultraviolet radiation, ozone, and oxidation, reducing thermal and ultraviolet degradation over time.
Flexibility and elongation: The membrane maintains elasticity at low temperatures and can accommodate building movement and thermal cycling without cracking.
Water tightness and seam performance: Properly installed seams deliver robust watertight protection; EPDM resists ponding water when detailed and drained correctly.
Longevity and maintenance: When installed and maintained according to manufacturer guidelines, EPDM systems can deliver multi-decade service life with minimal routine maintenance.
Common installation methods
Fully adhered: The membrane is bonded to the roof substrate using compatible adhesives, producing a continuous surface with reduced wind uplift susceptibility and a smooth appearance. This method is often selected for substrates where weight must be minimized or when a continuous bond improves load distribution.
Mechanically attached: Fasteners and plates secure the membrane to the roof deck at specified intervals. Mechanically attached systems are cost-effective and provide reliable performance, particularly on large-area roofs; however, fastener pattern and edge securement must be engineered for wind uplift resistance.
Ballasted: The membrane is loose-laid over a suitable substrate and held in place by ballast (typically rounded river rock or pavers). Ballasted systems minimize penetrations through the membrane and can be advantageous where rapid installation or future membrane access is desired. Ballast requirements must be calculated for local wind and structural loads.
Seaming and detailing Seams are critical to system integrity and are completed with either solvent-based or water-based liquid adhesives formulated for EPDM, or with factory-compatible pressure-sensitive or vulcanized seam tapes. Selection of seam material and method depends on membrane type (smooth or textured), manufacturer specifications, project conditions, and desired long-term performance. Proper surface preparation, adhesive application rates, seam rollings, and cure times are essential to achieve durable, watertight seams. Flashings, penetrations, and perimeter terminations require compatible accessories and workmanship to prevent leaks and ensure warranty compliance.
Design and specification considerations
Substrate compatibility: EPDM can be installed over insulation, lightweight concrete, structural decks, and recover boards; substrate preparation and compatibility checks are required.
Thermal and mechanical stresses: Account for roof movement, thermal expansion, and potential point loads when specifying attachment patterns and seam details.
Drainage and slope: Although EPDM tolerates ponding better than many membranes, adequate roof slope and drainage design reduce long-term risk and extend service life.
Warranty and manufacturer system: Use manufacturer-approved materials and certified installers to secure system warranties and ensure coordinated component performance.
EPDM remains a widely accepted choice for commercial low-slope roofing where a balance of durability, flexibility, cost-effectiveness, and proven performance is required. Proper design, selection of installation method, quality of seams and flashings, and adherence to manufacturer instructions are essential to achieving the expected service life
EPDM (ethylene propylene diene terpolymer) is a high-performance synthetic rubber roofing membrane engineered for durability and long-term weather resistance on low-slope and flat commercial buildings. Its polymer base is formed from ethylene and propylene—hydrocarbon feedstocks derived from oil and natural gas—combined with a diene component that enables effective vulcanization and cross-linking, producing a flexible, resilient membrane with excellent elasticity across a wide temperature range.
Key performance characteristics
Weather and UV resistance: EPDM provides outstanding resistance to ultraviolet radiation, ozone, and oxidation, reducing thermal and ultraviolet degradation over time.
Flexibility and elongation: The membrane maintains elasticity at low temperatures and can accommodate building movement and thermal cycling without cracking.
Water tightness and seam performance: Properly installed seams deliver robust watertight protection; EPDM resists ponding water when detailed and drained correctly.
Longevity and maintenance: When installed and maintained according to manufacturer guidelines, EPDM systems can deliver multi-decade service life with minimal routine maintenance.
Common installation methods
Fully adhered: The membrane is bonded to the roof substrate using compatible adhesives, producing a continuous surface with reduced wind uplift susceptibility and a smooth appearance. This method is often selected for substrates where weight must be minimized or when a continuous bond improves load distribution.
Mechanically attached: Fasteners and plates secure the membrane to the roof deck at specified intervals. Mechanically attached systems are cost-effective and provide reliable performance, particularly on large-area roofs; however, fastener pattern and edge securement must be engineered for wind uplift resistance.
Ballasted: The membrane is loose-laid over a suitable substrate and held in place by ballast (typically rounded river rock or pavers). Ballasted systems minimize penetrations through the membrane and can be advantageous where rapid installation or future membrane access is desired. Ballast requirements must be calculated for local wind and structural loads.
Seaming and detailing Seams are critical to system integrity and are completed with either solvent-based or water-based liquid adhesives formulated for EPDM, or with factory-compatible pressure-sensitive or vulcanized seam tapes. Selection of seam material and method depends on membrane type (smooth or textured), manufacturer specifications, project conditions, and desired long-term performance. Proper surface preparation, adhesive application rates, seam rollings, and cure times are essential to achieve durable, watertight seams. Flashings, penetrations, and perimeter terminations require compatible accessories and workmanship to prevent leaks and ensure warranty compliance.
Design and specification considerations
Substrate compatibility: EPDM can be installed over insulation, lightweight concrete, structural decks, and recover boards; substrate preparation and compatibility checks are required.
Thermal and mechanical stresses: Account for roof movement, thermal expansion, and potential point loads when specifying attachment patterns and seam details.
Drainage and slope: Although EPDM tolerates ponding better than many membranes, adequate roof slope and drainage design reduce long-term risk and extend service life.
Warranty and manufacturer system: Use manufacturer-approved materials and certified installers to secure system warranties and ensure coordinated component performance.
EPDM remains a widely accepted choice for commercial low-slope roofing where a balance of durability, flexibility, cost-effectiveness, and proven performance is required. Proper design, selection of installation method, quality of seams and flashings, and adherence to manufacturer instructions are essential to achieving the expected service life and protecting the building envelope.
-
GRP (Glass Reinforced Polymer) is a composite material formed by combining a polyester resin matrix with chopped strand mat glass fibres to produce a GRP laminate. The glass fibres provide structural reinforcement while the polyester resin binds the fibres and cures into a rigid, durable matrix. This combination yields a material with an excellent strength-to-weight ratio: high tensile and flexural strength with relatively low mass compared with traditional construction materials.
Key properties and benefits:
Structural performance: GRP laminates resist bending, impact and fatigue, making them suitable for load-bearing roof coverings and structural components.
Lightweight: Lower dead load simplifies handling, reduces substrate load requirements and can speed installation.
Corrosion and weather resistance: The cured resin matrix offers strong resistance to water ingress, chemical exposure and UV degradation when properly formulated and finished, contributing to long service life.
Design flexibility
GRP (Glass Reinforced Polymer) is a composite material formed by combining a polyester resin matrix with chopped strand mat glass fibres to produce a GRP laminate. The glass fibres provide structural reinforcement while the polyester resin binds the fibres and cures into a rigid, durable matrix. This combination yields a material with an excellent strength-to-weight ratio: high tensile and flexural strength with relatively low mass compared with traditional construction materials.
Key properties and benefits:
Structural performance: GRP laminates resist bending, impact and fatigue, making them suitable for load-bearing roof coverings and structural components.
Lightweight: Lower dead load simplifies handling, reduces substrate load requirements and can speed installation.
Corrosion and weather resistance: The cured resin matrix offers strong resistance to water ingress, chemical exposure and UV degradation when properly formulated and finished, contributing to long service life.
Design flexibility: GRP can be moulded to complex shapes and detailed profiles, enabling seamless, bespoke roof systems and waterproofing solutions.
Low maintenance: Properly finished GRP surfaces require minimal ongoing maintenance compared with many traditional materials.
Manufacture and quality considerations:
Resin selection and glass content determine mechanical properties and durability; polyester resins are common, but formulations vary to meet specific performance or environmental requirements.
Laminating technique, fibre orientation and consolidation affect laminate integrity. Controlled curing and post-cure processes reduce voids and improve bond strength.
Surface finishes (gelcoats or topcoats) protect the laminate from UV and chemical attack and contribute to aesthetics and non-slip performance where required.
Installation quality is critical: correct detailing at seams, upstands, flashings and penetrations ensures the system remains waterproof and performs to expected life span.
Applications: GRP is widely used for roofing systems, guttering, lightweight decking, cladding panels and bespoke architectural components where durability, shapeability and reduced weight are priorities.
At M.A Roofing & Maintenance we specify and install GRP systems selected for the project’s load, exposure and longevity requirements, and we follow best-practice fabrication and detailing to ensure a durable, watertight finish.
-
Slating and tiling are traditional roofing systems that provide long-term durability, excellent weather resistance, and strong aesthetic appeal. Both systems form a layered protective covering that sheds water, resists wind uplift, and contributes to the thermal and acoustic performance of a building, but they differ in materials, installation technique and maintenance needs.
Slating
Materials and properties: Slate is a natural metamorphic rock split into thin, flat sheets. High-grade slate offers exceptional durability, often lasting 75–150+ years when properly installed. Slate is fire-resistant, dimensionally stable, very low in water absorption, and available in a range of natural colours and textures.
Installation: Slate tiling is precision work. Slates are laid in overlapping courses and fixed with corrosion-resistant nails or hooks to battens or directly to roof decking. Proper headlap, side lap and course gauge must be observed to achieve effective water shedding. Lead or modern underlays and flashings are used at valleys, abutments and penetrations to ensure watertightness.
Performance and maintenance: Slate roofs require minimal maintenance but do need periodic inspection for cracked or slipped slates, degraded fixings, and flashing integrity. Repairs must match slate thickness and colour and be executed by experienced roofers to preserve weatherproofing and appearance.
Tiling
Materials and properties: Roof tiles are produced from clay, concrete, terracotta or composite materials. Clay and terracotta tiles are fired natural products with good longevity (often 50–100 years for quality clay), while concrete tiles are engineered for strength and affordability and can be colour-treated. Tile profiles include flat, interlocking and pantile shapes, each influencing water run-off, ventilation and aesthetic character.
Installation: Tile roofs are typically laid on battens fixed over an appropriate underlay. Interlocking tiles simplify alignment and reduce the risk of wind uplift; non-interlocking profiles require precise fixing and larger headlaps. Correct batten spacing, eaves and ridge details, and secure ridge and hip systems are critical. Flashings, ventilation and underlay selection are essential to control condensation and ensure durability.
Performance and maintenance: Tile roofs offer robust protection and are relatively straightforward to maintain. Routine inspections focus on broken or slipped tiles, ridge and hip condition, mortar or mechanical fixing of ridges, and the state of flashings and gutters. Replacement tiles should match existing profile and fixing method to maintain integrity.
Key considerations for both systems
Structural loading: Slate and tile are heavier than many alternative coverings. Roof structure must be assessed to confirm it can support the dead load plus live loads (snow, maintenance access). Reinforcement or redesign may be necessary for older buildings.
Weatherproofing details: Underlays, flashings, eaves, valleys, abutments and penetrations must be detailed and executed correctly. These junctions are the most common sources of failure if not installed by competent roofers.
Skilled installation: Both slating and tiling demand experienced tradespeople familiar with material-specific cutting, fixing and detailing. Quality workmanship directly affects lifespan, performance and warranty eligibility.
Sustainability and lifecycle: Natural slate has a low embodied energy per lifespan because of its longevity; clay tiles can be recycled or reclaimed; concrete tiles have higher embodied energy but are often long-lived and recyclable at end of life. Consider lifecycle costs, maintenance and disposal options when selecting materials.
For commercial or domestic projects, M.A Roofing & Maintenance provides professional assessment, specification and installation of slate and tile roofs, including structural checks, ventilation and condensation control, appropriate underlay and flashing solutions, and a programme for planned inspections and maintenance to maximise service life.
-
Stone roofing is a traditional, durable roofing system that uses natural stone tiles or slabs to protect and finish a building’s roof. Typical installation begins with a solid substrate—either continuous sheathing or a system of timber battens—onto which the stone units are laid. Stone tiles are bedded and secured with a lime- or cement‑based mortar, and in many installations additional fixings such as stainless‑steel pegs or clips are used to improve wind uplift resistance and long‑term stability.
Key characteristics and benefits
Durability: Properly installed stone roofs can last for a century or more. Natural stone resists weathering, UV degradation and ozone, and ages with a predictable, often attractive patina.
Weather performance: Stone provides excellent protection against driving rain and wind when courses are correctly profiled and lapped. Mortar joints and flashings, correctly detailed, prevent water ingress at vulnerable junctions.
Fire resistance and thermal properties: Stone is non‑combustible and contributes thermal mass, helping moderate temperature swings within the roof space and building.
Aesthetics and conservation: Stone roofing remains a preferred choice for traditional and historic buildings, particularly in regions such as Oxford where local vernacular and conservation considerations favour authentic materials and appearance.
Low maintenance: Once settled and pointed, stone roofs require relatively little routine maintenance compared with many modern coverings. Inspections should focus on pointing, flashings, and any displaced or cracked stones.
Considerations for specification and installation
Substrate and load: Natural stone is heavy; the roof structure and supporting walls must be designed or assessed to carry the imposed dead load plus imposed loads such as snow. Structural strengthening may be required on older buildings.
Stone type and sourcing: Local stone types vary in density, porosity and freeze‑thaw resistance. Choose stone suited to the local climate and compatible with historic fabric where applicable.
Mortar and pointing: Use appropriate mortar mixes (lime or lime‑cement blends for heritage projects; hydraulic cements where specified) to allow compatible movement and breathability. Overly rigid mortars can cause stone or masonry damage.
Fixings and uplift resistance: In exposed locations, additional mechanical fixings (stainless steel pegs, clips or hooks) are recommended to prevent slippage and wind uplift.
Flashings and junctions: Flashings at valleys, chimneys, ridges and eaves must be detailed in durable materials and integrated with the stone courses to avoid leaks. Lead, lead‑free alternatives or appropriately detailed metalwork are commonly used.
Conservation and regulatory requirements: For listed or conservation area properties in and around Oxford, adhere to local planning and conservation officer guidance. Retain traditional detailing and seek approvals where necessary.
Maintenance and inspection
Regular inspections (at least annually and after severe weather) to check for displaced stones, broken tiles, deteriorated mortar joints and compromised flashings.
Repointing and replacement of individual stones should use like‑for‑like materials and compatible mortars to maintain performance and appearance.
Prompt repair of damaged flashings and gutters helps prevent water penetration and secondary damage.
When to choose stone roofing Stone roofing is appropriate where longevity, aesthetic authenticity and fire resistance are priorities and where the structure can support the weight. It is especially suitable for conservation projects, period properties and high‑quality new builds seeking a traditional finish in the Oxford area.
For a site assessment, specification advice or restoration/installation quotations, engage a roofing contractor experienced in stone roofing and, for historic buildings, consult conservation specialists to ensure compliant and durable outcomes.
-
Corrugated roofing consists of interlocking sheets—typically galvanized steel, aluminum, or polymer—pressed into a repetitive wave (corrugation) profile. This profile increases the section’s rigidity, allowing long spans between supports and improving load-bearing capacity without a significant rise in material thickness. Key commercial advantages include:
Durability: Metal corrugated panels resist impact, rot, insect damage and, when properly coated, corrosion. Polymer variants resist chemical exposure and do not rust. With appropriate maintenance and coatings, service life commonly exceeds 25 years for metal systems.
Structural performance: The corrugated profile increases stiffness and distributes loads (snow, wind, foot traffic) across the roof structure. This reduces the need for dense purlin spacing and can lower structural framing costs on large-span buildings.
Weather resistance and waterproofing: Overlapping installation, ridge and eave flashings, and compatible sealants create effective water-shedding systems. Metal panels often incorporate protective coatings (zinc, zinc-aluminum, or painted finishes) and sealant details to resist corrosion and reduce leak potential.
Thermal and acoustic considerations: Uncoated metal conducts heat; thermal performance can be improved using insulation, insulated panels (sandwich panels with foam cores), or reflective coatings to reduce solar heat gain. Acoustic transmission (rain noise) can be mitigated with insulation, underlayment, or engineered deck systems.
Cost-effectiveness: Material and installation costs are generally lower than many standing-seam or membrane systems, especially for large-area commercial, industrial, and agricultural buildings. Longevity and low maintenance needs improve total lifecycle value.
Versatility and installation: Panels are available in multiple gauges, profiles, finishes, and lengths (including long-run, site-cut options), and can be installed over battens/purlins or directly onto decks. Fastening systems include exposed fasteners for economy and concealed-fastener systems for enhanced weather performance and aesthetics.
Sustainability and recyclability: Steel and aluminum corrugated panels are highly recyclable. Light weight reduces transportation energy and framing requirements, and many coatings are available with low-VOC formulations.
Applications: Corrugated roofing is well-suited to warehouses, manufacturing facilities, agricultural buildings (barns, sheds), commercial outbuildings, and some low-slope retail or institutional roofs. Specifying the correct panel gauge, profile, finish, fastening system, and underlayment is essential to meet load, longevity, thermal, and acoustic requirements for each project.
For a project quote or specification guidance, we can assess your building’s span, loading, exposure, and performance goals to recommend the optimal corrugated roofing system and detailing.
-
Repointing is the controlled removal and replacement of deteriorated mortar from the joints between masonry units (brick, stone, or block) in exterior or interior walls. Over time, mortar joints are exposed to weathering, moisture migration, freeze-thaw cycles, vibration, settlement and chemical attack; when mortar weakens or crumbles it permits water ingress and accelerates masonry decay. Proper repointing restores the joint profile, reestablishes a durable weatherproof seal, and transfers loads correctly between masonry units—helping to maintain structural integrity and prevent costly failures such as spalling, cracking, or bulging.
A professional repointing specification includes:
Condition assessment: Inspecting joint depth, mortar composition, bond strength and extent of damage to determine whether full repointing or localized repairs are required.
Material matching: Selecting a compatible mortar mix that matches the original in strength, color, texture and permeability. Using an overly hard or impermeable cement mortar on softer historic masonry can cause accelerated deterioration of the masonry units.
Correct removal: Removing only the failed mortar to a controlled depth (typically twice the joint width or to sound mortar), using hand tools or low-impact mechanical methods to avoid damaging adjacent masonry faces.
Proper joint preparation: Cleaning out debris, dampening the joint to prevent suction, and ensuring sound contact surfaces for new mortar.
Application and tooling: Compacting the new mortar in layers to eliminate voids, profiling the joint to match historic appearance, and tooling to promote proper water shedding.
Curing and protection: Protecting repointed areas from rapid drying, freezing, or driving rain during initial cure to achieve intended strength and durability.
Quality assurance: Final inspection for joint appearance, bond integrity and absence of voids; plus documentation and maintenance recommendations.
Benefits of professional repointing:
Prevents moisture penetration and related problems such as mold, efflorescence, rusting of embedded metals and freeze-thaw damage.
Preserves load-bearing capacity and reduces risk of structural distress.
Extends the service life of masonry and enhances building aesthetics.
Helps maintain historic character where applicable by matching original mortar properties and joint profiles.
For business and heritage properties, repointing should be specified and executed by experienced contractors who can analyze existing mortar composition, select appropriate materials, and apply industry best practices to ensure longevity and minimal impact on the surrounding masonry.
-
Emergency Roof Repairs — Immediate, Professional Response
Emergency roof repairs address sudden, significant roof damage from events such as severe storms, high winds, hail, fallen trees, fire, or unexpected structural failures. Prompt intervention is essential to stop water ingress, prevent progressive structural deterioration, protect interior property, and ensure occupant safety. Delaying repairs can increase repair scope and cost, and may expose building owners to additional hazards like mold growth, electrical risks, and compromised structural members.
What we provide
24/7 rapid response: M.A. Roofing & Maintenance operates a dedicated emergency hotline and dispatch team available around the clock to assess and begin mitigation as soon as you contact us.
On-site emergency assessment: A qualified technician will perform an immediate visual and hands-on inspection to identify active leaks, structural dangers, and temporary containment needs.
Temporary protection and containment: We install emergency measures—tarps, plywood boarding, temporary flashing, and water diversion—to stabilize the roof and limit further damage until permanent repairs can be completed.
Immediate hazard control: If hazards are present (loose debris, exposed electrical components, or unstable roof sections), we secure the area and coordinate with property managers or emergency services as needed.
Clear scope and cost estimates: Following the initial mitigation, we provide a detailed report describing damage, recommended permanent repairs or replacement options, projected timelines, and transparent cost estimates to aid insurance claims and decision-making.
Permanent repair and restoration: Our certified crews perform high-quality permanent repairs or full roof replacement using industry-standard materials and installation methods, with attention to flashing, insulation, ventilation, and structural integrity.
Insurance liaison: We can assist with documentation (photographs, damage reports) to support insurance claims and communicate directly with insurers when requested.
Safety and compliance: All work is performed according to current building codes and safety standards. Our technicians are trained in fall protection, site safety, and proper handling of roofing materials.
Post-repair warranty and follow-up: We provide clear warranty terms on repairs and materials and conduct follow-up inspections to ensure the roof performs as expected.
When to call us
Active interior leaks or pooling water
Visible structural damage (sagging decks, displaced trusses)
Large areas of missing or lifted roofing material
Fallen trees or large debris penetrating the roof
Fire or impact damage with exposed structure
After severe weather when damage is suspected but not obvious
Why choose M.A. Roofing & Maintenance
Immediate availability: 24-hour emergency response to minimize further loss.
Experienced professionals: Technicians trained in emergency mitigation and permanent roofing solutions across residential and commercial properties.
Transparent communication: Prompt, honest estimates and clear documentation for repairs and insurance.
Quality workmanship: Durable repairs using industry-approved materials and methods.
Safety-first approach: Strict adherence to safety practices and building code compliance.
If you are facing an urgent roofing issue, contact our emergency line immediately. Our team will prioritize rapid containment, safety, and a clear plan to restore your roof and protect your property.

-
zoe carter
17:23 (23 minutes ago)
to Myran, me
A Complete Roof Renewal for Long-Term Protection
If your roof is showing signs of age, deterioration, leaks or general wear and tear, a full re-roof can provide a cost-effective way to restore your roof’s performance, improve its weather resistance and give your property many more years of protection.
Our professional re-roofing service involves stripping the existing roof covering where required, inspecting the underlying structure and renewing the key components of the roof using modern, reliable materials and installation methods.
A re-roof is more than simply replacing the tiles. It gives you the opportunity to upgrade the materials underneath the roof as well, helping to improve the overall performance and longevity of the roof.
Upgrading from Old Felt to Modern Breathable Membrane
Many older roofs were constructed using traditional non-breathable roofing felt. As part of a re-roof, we can replace the old-style felt with a modern breathable roofing membrane.
Breathable membranes are designed to allow moisture vapour to escape from within the roof construction while helping to prevent wind-driven rain and external moisture from entering. This can help improve ventilation and moisture management within the roof space.
Replacing an ageing membrane also provides an opportunity to identify and address any deterioration, damage or weaknesses that may have developed over the years.
Renewing the Roof Battens
As part of the re-roofing process, the existing roof battens can be removed and replaced with new, correctly specified roofing battens.
Old battens can deteriorate over time, particularly where they have been exposed to moisture. Installing new battens provides a sound and secure fixing system for the roof covering and ensures the tiles or slates are supported correctly.
New battens also allow the roof covering to be installed to the appropriate gauge and specification, helping to achieve a neat, secure and professional finish.
Reusing Your Existing Tiles Where Possible
Where the existing roof tiles are in suitable condition, there may be an option to carefully remove, inspect and reuse the existing tiles.
Reusing suitable original tiles can help retain the character and appearance of the property while reducing the amount of new material required.
Every tile can be assessed during the re-roofing process, with damaged, cracked or unsuitable tiles identified for replacement.
Reclaimed Like-for-Like Tiles
For older or character properties, we can also offer the option of sourcing reclaimed, like-for-like roofing tiles where appropriate.
This can be particularly useful when maintaining the traditional appearance of a property or when matching an existing tile is important. Reclaimed tiles can often provide a closer visual match than modern alternatives.
Where suitable reclaimed tiles cannot be sourced, or where the customer prefers a new product, new replacement tilescan be supplied and installed.
New Tiles and Modern Roofing Options
A re-roof also gives you the opportunity to completely update the appearance of your property with new roofing materials.
Depending on the property and existing roof, we can discuss suitable options for new tiles or other appropriate roof coverings, taking into consideration the style of the building, existing materials and the desired finished appearance.
The Benefits of a Professional Re-Roof
A properly carried-out re-roof can provide a number of benefits, including:
Improved weather protection against rain, wind and the elements
Modern breathable membrane replacing old-style roofing felt
New roofing battens providing a secure fixing system
Opportunity to identify and address hidden deterioration
Improved moisture management within the roof construction
The option to reuse suitable existing tiles
The option to use reclaimed like-for-like tiles for traditional properties
The option to install new replacement tiles
Improved overall appearance and kerb appeal
Greater peace of mind from a renewed roof covering and underlying components
The opportunity to upgrade an ageing roof rather than continually repairing individual areas
A Tailored Re-Roofing Solution
Every roof is different, which is why we assess the existing roof before recommending the most suitable approach.
Depending on the condition of the existing materials, your requirements and the character of the property, your re-roof can be tailored around reusing suitable existing tiles, incorporating reclaimed like-for-like tiles, or installing new tiles.
Our aim is to provide a durable, practical and professional roofing solution while maintaining the appearance and character of your property wherever possible.
Protect Your Property for the Years Ahead
If your roof is reaching the end of its serviceable life, a complete re-roof can be an opportunity to renew the roof from the membrane and battens upwards rather than continuing with repeated repairs.
Some examples of roofs we have completed!
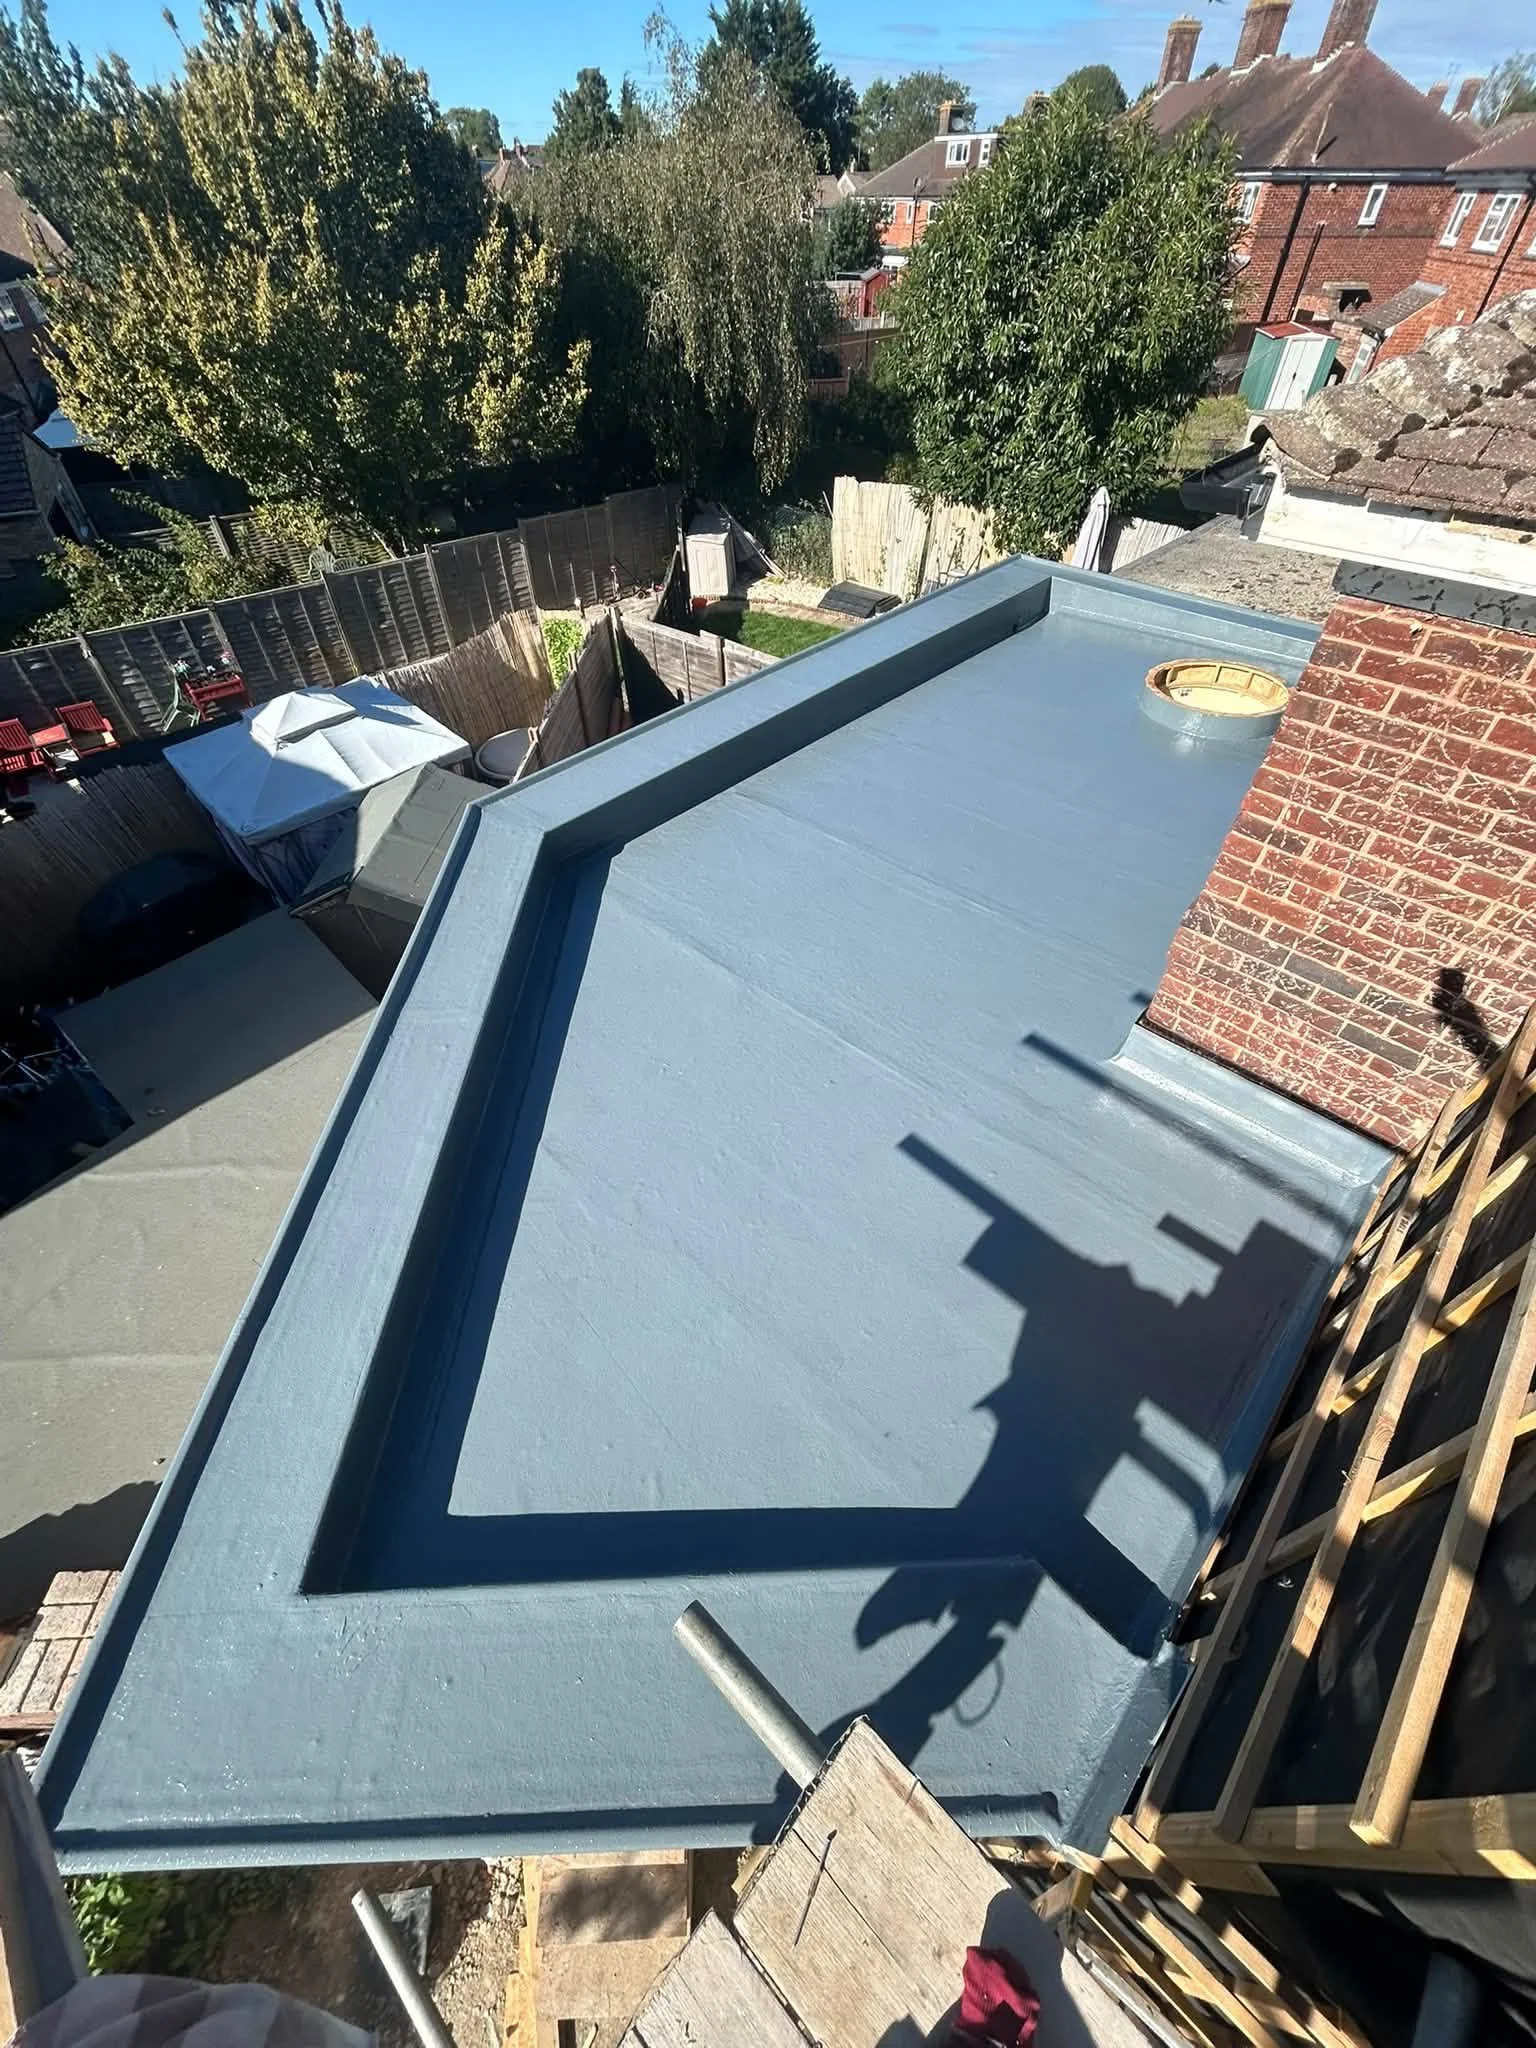
This is an example of one of our durable, professionally installed fiberglass roofing systems.
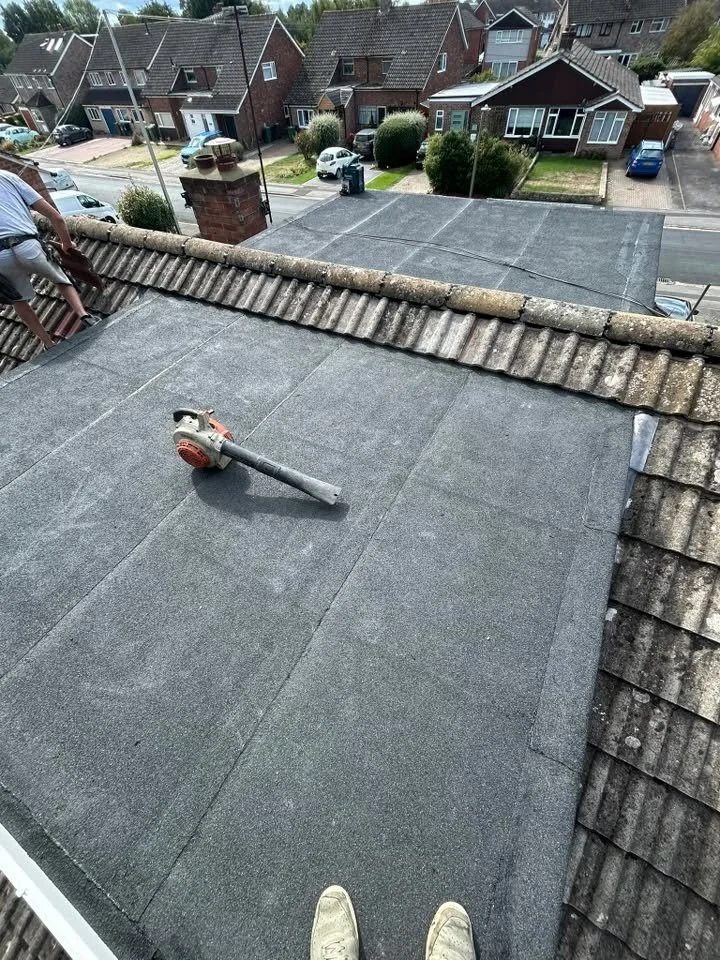
This is an example of one of our felt roofs, expertly installed and professionally maintained to provide long-lasting protection.
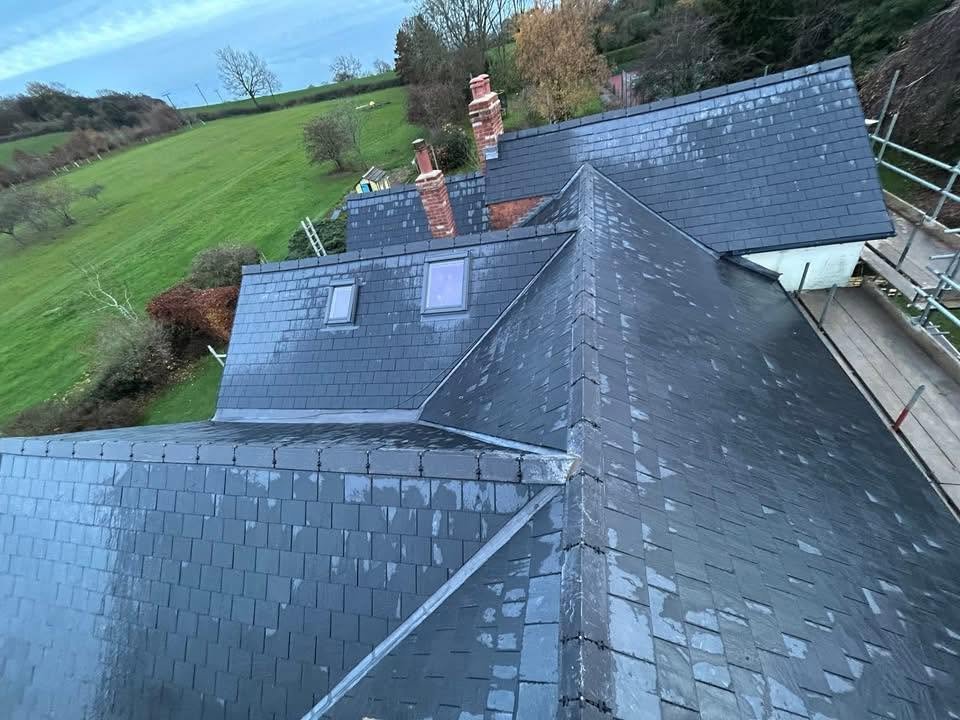
This is an example of one of our well-maintained slate roofs, showcasing high-quality craftsmanship and meticulous attention to detail.
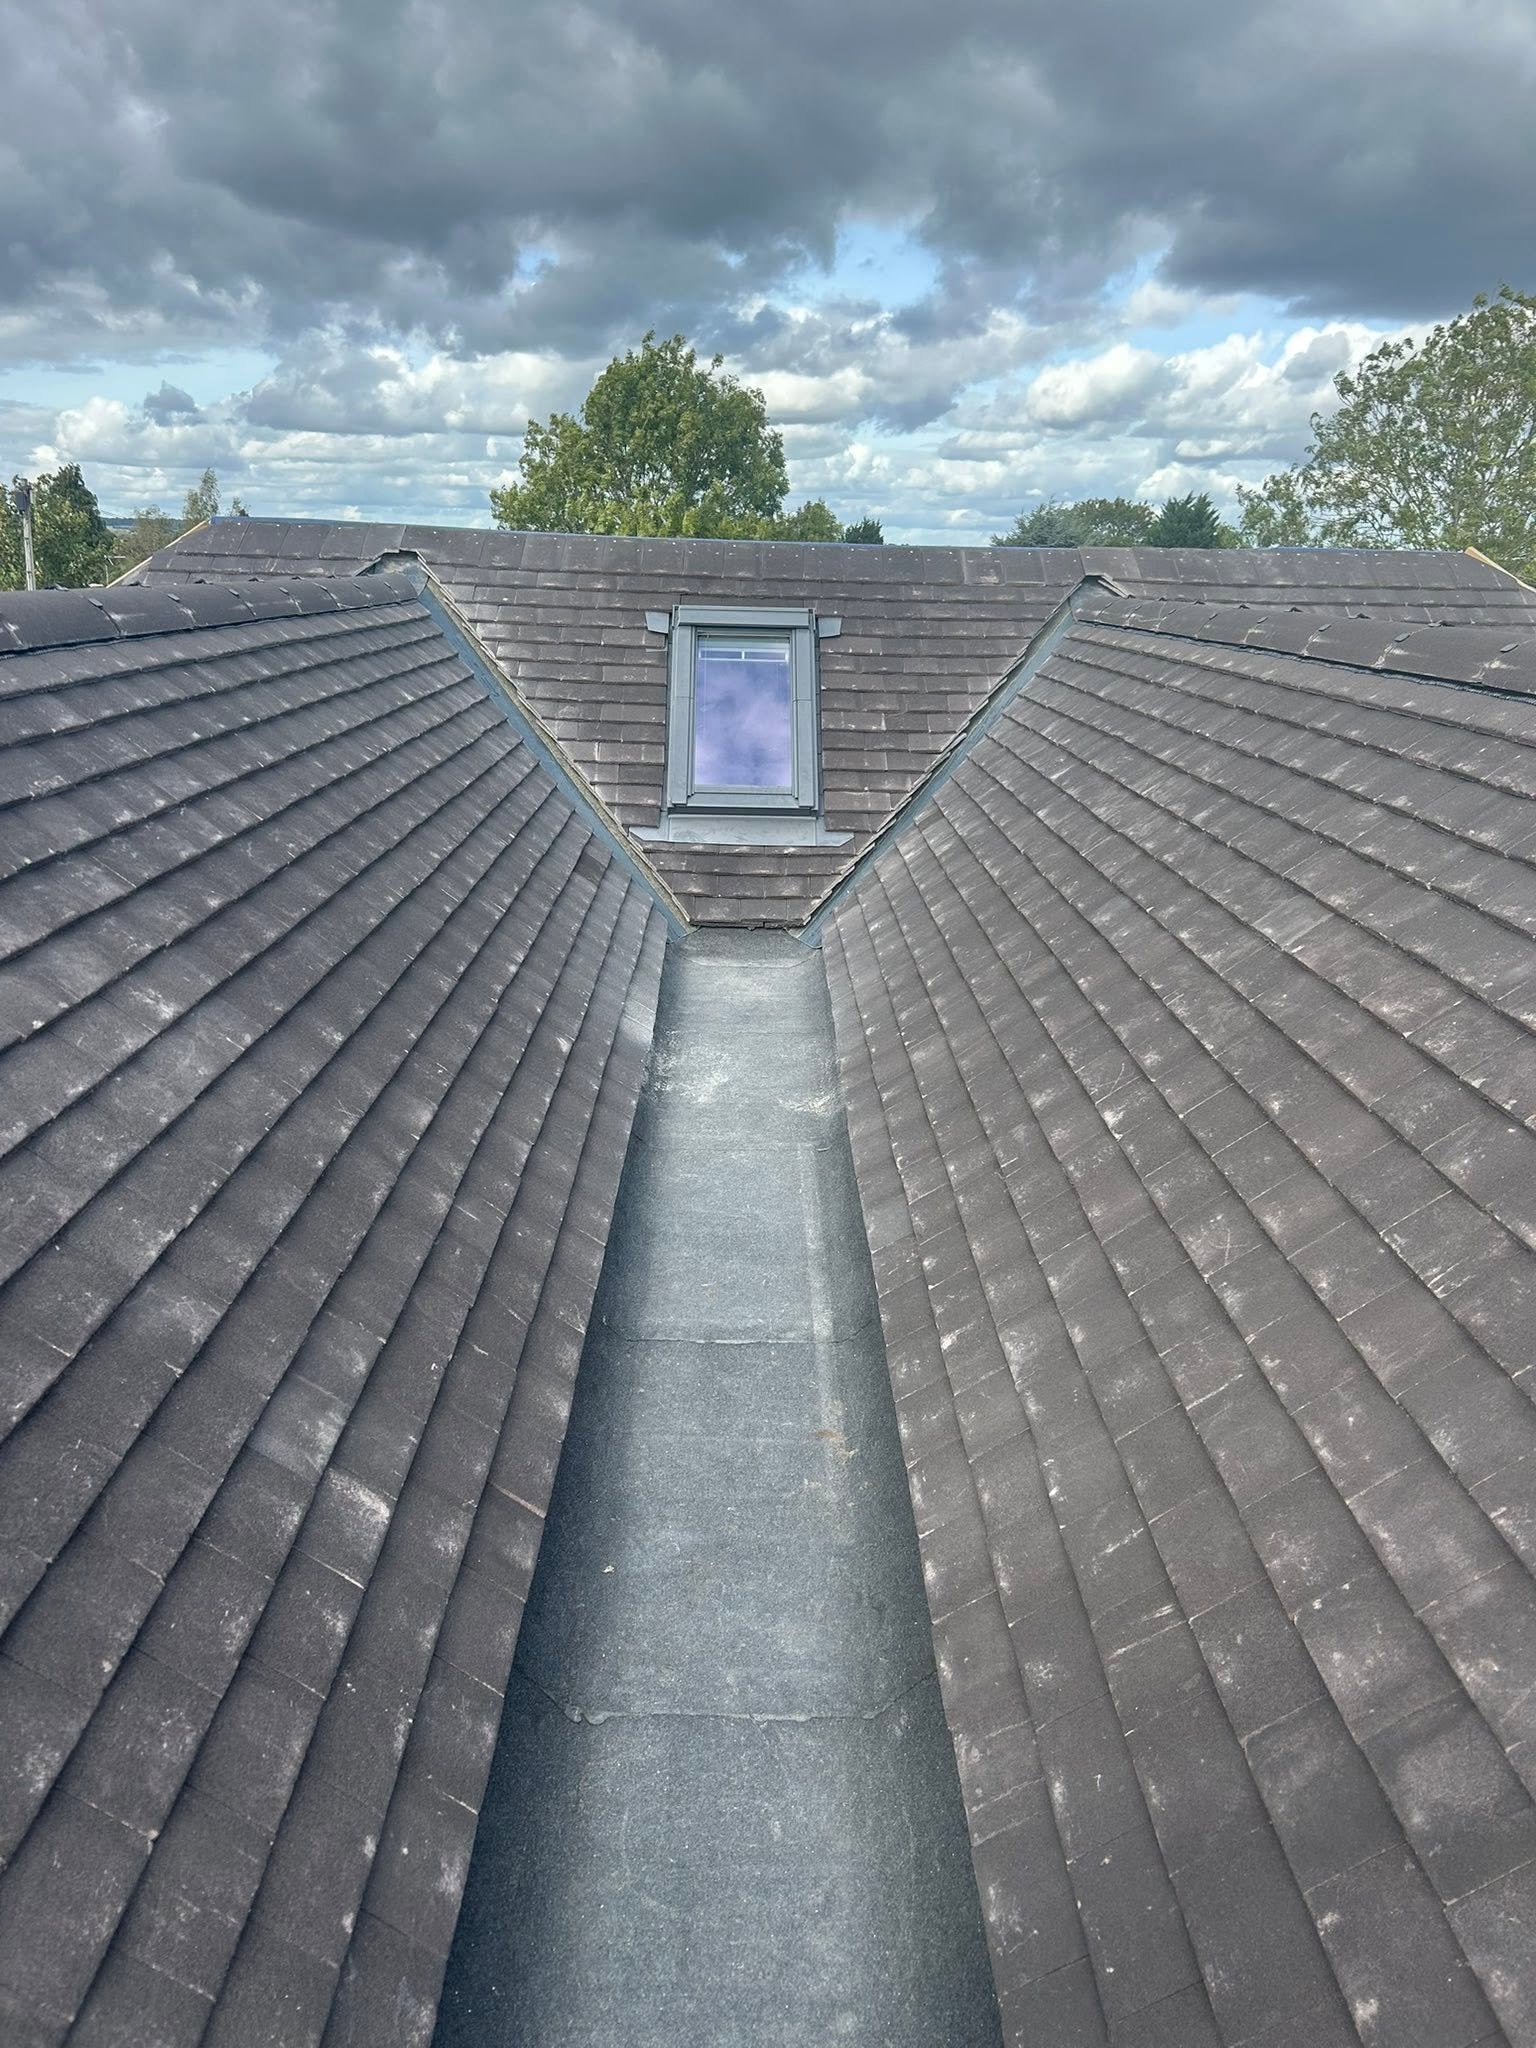
This photograph shows a completed tile roof installation by M.A. Roofing & Maintenance, demonstrating our workmanship, attention to detail, and use of durable materials.